Buffer Busy Waits – Reverse Key Index – Demo

We discussed earlier about indexing, and specifically reverse key indexing.

I mentioned that is a solution for buffer busy waits on numerical consecutive inserted keys (like the sequence based generated ones) .

This post will test that solution.

For regular index test, I’ve created the following table, sequence and associated index:

create table test_tb
( row_id number
, text varchar2(100));

create sequence test_seq start with 1 increment by 1 cache 10000;

create index test_nidx on test_tb(row_id);

and a simple procedure that will insert the rows:

create or replace procedure insert_n (p_rows number default 10000) as 
begin
 
 for i in 1..p_rows loop
 insert into test_tb
 select test_seq.nextval, 'test row '||test_seq.currval from dual;
 
 end loop;
 commit;
end;
/


For the reverse key index test:

create table test_tb2
( row_id number
, text varchar2(100));

create sequence test_seq2 start with 1 increment by 1 cache 10000;

create index test_ridx on test_tb2(row_id);

and a simple procedure that will insert the rows:

create or replace procedure insert_r (p_rows number default 10000) as 
begin
 
 for i in 1..p_rows loop
 insert into test_tb2
 select test_seq2.nextval, 'test row '||test_seq2.currval from dual;
 
 end loop;
 commit;
end;
/

To test the effect of concurrent inserts, I’ve executed both procedures from 3 sessions (please note in my case number of sessions is small, but will still show us the impact of the two types of indexes):

execute insert_n(100000);

execute insert_n(100000);

Now looking at the buffer busy waits we had we see a reasonable benefit already of the reverse key index:

buffer busy waits - SQLbuffer busy waits

select object_name, value, statistic_name,object_type
from v$segment_statistics
where owner='C##INSIGHT'
and object_type='INDEX'
and statistic_name='buffer busy waits'
and object_name like 'TEST%'
;


Advertisement

OBIEE Security (3) – 11g Dashboard Security

What?

Security can be applied also at a more granular object level, and used in customizing the same dashboard for different users groups, by securing sections and tabs.

When would you use this?  When you want to have users accessing the same dashboard but seeing different content:

– e.g. your management will also want to look at the overall team progress alongside the individual progress (new tab for team progress in same dashboard)

– your different regions or user groups will want to have different filtering criteria on same report – you can achieve this by applying the entire selection of filters with is prompted, while showing for each group a different prompt with only the selectors the user/group of users would want to see for each region/group/organization.

How?

Post will explain on a simplistic way how to achieve section and tab security. Applicability will depend on your business.

Tab Security

On the targeted dashboard go to Edit, and from Dashboard Options options select  Dashboard Properties.

dashboard options

You will see there a list of your existing pages in the Dashboard Pages section

hidden

on which you’ll have various options:

  1. Rename
    page options - explained
  2. Select a prompt to capture default filters and variables
  3. Permissions
  4. Delete Page
  5. Specify who can save Shared Customizations
  6. Specify who can assign Default Customizations
  7. Hide Page check-box
  8. Show Add To Briefing Book check box
  9. Change order of tabs

A hidden page, when run, will display dashboard name and content (no tabs nor page name are displayed)

hidden page run

Please note that My Dashboard will only have available options:

  • rename
  • select a prompt to capture default filters and variables
  • delete
  • hide page
  • Add To Briefing Book
  • Change order of tabs

Permission are set up similar to Folder permissions, with different levels of permissions:

page permissions

  • Full Control
  • Modify
  • Open
  • No Access
  • Custom

Section Security

Within a page, you have multiple sections.

dashboard

When clicking the Section Options, you will be able to:

  • make it conditional
  • change permissions
  • rename
  • change formatting
  • allow drill in place
  • allow collapse
  • show/hide section header/title

section options

Permission at section level are set up with Granted/Denied option. (you either allow a user/role/group to see/execute the section or not)

Section permissions

On my example, the a_test user will have restricted access, while Admins will see additional content.

test user access:

test user - dashboards test user - pages and sections

Administrator access:

weblogic - dashboards weblogic - pages and sections on welcome

Note: Please note this tests were done on OBIEE 11.1.1.7.1.

OBIEE Security (2) – 11g Catalog Objects & Access to Users Folders

What?

You would have been into the situation where you were requested to apply security on the OBIEE exposed objects.

First level of security that we are going to discuss now is folder level security (this implies granting access to both folders as well as dashboards) through managing catalog security.

How?

There are 2 main options to implement this security:

  • front end – from the presentation services
  • back end – from the catalog manager

OBIEE Front-End Security

Browse through your catalog until you reach your desired main folder/object on which you want to apply security.

Our example shows application on the OBIEE folder “Shared Folders/00. BI Insight – demos”.

Select the folder from the tree at the right side and then click Permission from the bottom of the right column. Second option is selecting parent Folder from Tree view column, then select folder from list view column, and click on “More” link. A Permissions option/link will appear.

Catalog - folder - permissions - links

You will notice you have various options now available:

  1. Apply effective permissions
  2. Replace with parent’s folder permissions
  3. Set parent folders permissions to “Traverse Folder”
  4. Add users/roles
  5. Apply permissions for selected users/roles
  6. Delete selected users/roles
  7. Applying permissions to sub-folders (selecting a number of group/role/users – button will display the list of available privileges and apply the selection to all selection)
  8. Applying permissions to all items within folder

When adding permissions (on click on the plus button), you will have options to add Application Roles, Catalog Groups or Users. Search list allows you to select by any of the above categories, or overall:Catalog - folder - permissions - add options

Write your search criteria (or leave blank when you want the full list) and click the Search button

Catalog - folder - permissions - add

then select the desired User/Role/Group and move to the right (Selected Members list):

Catalog - folder - permissions - permissions options

then select the type of Permissions you want to grant and click OK.

You can grant:

  • Full ControlCustom Permissions
  • Modify
  • Open
  • Traverse
  • No Access
  • Custom
  1. Custom permission allows any combination of the available rights on the right.
  2. Full Control – all rights from image;
  3. Modify – Read, Traverse, Write and Delete Permissions
  4. Open – Read & Traverse Rights (this is the typical right to be granted to a consumer of reports)
  5. Traverse – available only for folders – it allows users to access items within the folder, but not creating/adding additional information to the folder itself;
  6. No Access – denied access to the object

After getting your selections and rights in order, you can also set up the owner (by selecting the appropriate radio button – default is no selection if creator of report/current owner is not in the list). You can then apply your permissions on current folder only, or recursively on the sub-folders (child folder tree) and/or the items within the folder (analysis, dashboard, prompt, filter …) by checking the appropriate check-boxes at the bottom of the pop-up window:

Apply permission - subfolders and items

As a test, I’ve logged in with my test user a_test (member of OBIEE Top Management application role) and I can only see my selected folder in the Shared Reports folder.

a_test permission  - validate:

OBIEE Back-End Security

The second option of implementing this type of security is using the Catalog Manager tool.

Open Catalog online, using Catalog manager

Catalog Manager - open

by specifying  the URL and using an Admin user (e.g. weblogic)

CM - Open

This will provide you with a Tree view

CM - Tree

and a Table view:

CM - Users Folder

You will be able to view:

  • system folders
  • shared folders
  • users folders

All under root.

Please note the view provided by the catalog manager or namings will depend on your version of OBIEE. However, principles explained in this blog will still apply.

When selecting a given folder you can access various options, like Copy, Cut, Rename, Smart Rename, Create, Permissions and Properties.

CM - right click

So Catalog manager will not only allow you to change permissions, but also properties (Applied recursively )

CM - Folder Properties

or managing your folders content.

The permissions screen is pretty much similar to the one on the OBIEE front end:CM - Permissions - edit

allowing adding permissions, changing them or removing them.

In the same way, you can add permissions on Application Roles and/or Catalog Groups and/or Users, with the same option types

CM - Permissions - list optionsCM - permissions - options

You can apply changes Recursively, however this will apply them to both Sub-folders and items within the folder. There is no distinction at this level between the two types.

You also have a Replace Option, as presented bellow:

CM - Permissions - applicability opions

The effect on both security implementation options (Catalog Manager/Front End) is similar for the end user.

Applicability

There are various test cases when you might choose using the Catalog Manager over the Front-End setup of security.

One of the most common issues experienced by users is linked to the user’s personal folders:

  • general unable to access (cannot see my folder)
  • unable to access saved selections
  • unable to create any more saved selection

In this type of scenario, Catalog Manger will allow you access to user’s folder. Solution is to re-grant the user Full Control to his own folder – applied recursively.

Note: Please note this tests were done on OBIEE 11.1.1.7.1.

OBIEE Security (1) – Users, Groups and Application Roles

Why?

As OBIEE is targeted as an enterprise wide solution for reporting, and single point of truth, you might experience the need for securing your content based on your targeted audience.

This series of OBIEE Security posts will explain how this can be accomplished and a couple of base factors in implementing security.

You will have different categories of users seeing different content types. So, the first thing you’ll need to do is define these categories for your company/delivered solution.

Now, please note, a user is not restricted to a single category. For instance, you might have a category for High Management. The HR head of a company will pertain to this, but he can also pertain to a second HR group, looking only at HR related data.

However your user-group association is provided for OBIEE, either LDAP, Database table (maintained through an application), direct association in WebLogic, there are several steps you will still need to proceed with in setting up your security.

Please keep in mind all security is applied on Application Roles (as a best practice) – both content, privileges as well as data security. The following steps will guide you through the entire process of creating a user, the associated group, then the Application Role and setting up the membership setup for the above. This will help you further on in setting up you security.

How?

One of the biggest differences between OBIEE 10g security and OBIEE 11g security is that users and groups are no longer held primarily in the repository; instead, these details are held by default in the WebLogic Server LDAP server, which gets installed alongside OBIEE when you install the product.

Now, you create users and groups within this LDAP server, and administer these users and groups using the WebLogic Server Administration Console.

In an out-of-the box installation, the LDAP integration is not configured from start. So, if your list of users is not provided from outside, you will need to create them within WebLogic.

Creating a new user

For creating a new user, login to your WebLogic Server Administration Console with an admin user (e.g. weblogic), accessing the link formatted as ::/console.

By default, the server is defined as the IP address where you have installed your BI Instance, and the default port for the Administration Console is 7001.

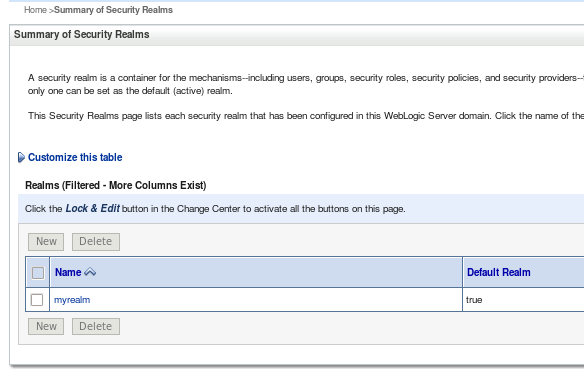
Go to Security Realms on the left hand side of the screen:

WLSAC - home

then select the security realm your BI Server is using (Default is myrealm):

WLSAC - Security Realms

and navigate to Users and Groups -> Users:

WLSAC - myrealm

In here, you will have a list of all existing users (both your regular application users as well as some internal administration users for OBIEE), and the possibility to modify, delete or add a user.

For creating the user, please make sure to fill in all appropriate details:

WLSAC - Create new userWLSAC - Create new user - filled

Groups

Groups are deprecated in OBIEE 11g, and are replaced by Application Roles in the setup of security.

However, you will notice they still appear in WebLogic Server Administration Console.

These are usually generated from LDAP (together with your users list and authentication method).

For creating a new group, please follow these steps:

– from my realm (previous step on creating new user) go to Groups from the Users and Groups tab

WLSAC - Groups - new group - success

and add new group. Please make sure you fill in all appropriate details.WLSAC - Groups - new group - filled

Group membership

Please note, a group does not have an automated allocated member / parent group.

For this, you will need to go to the list of groups, select your group and go to Membership

WLSAC - Groups - list - with new group

then select and drag on the right hand side the desired list of existing groups as a chosen parent group.

WLSAC - Groups - Top Management - membership

The above setup implies that the new group TopManagement is a member of BIConsumers. This is a generic group stating the user will be consuming/executing BI Content. I would recommend any new group to have this as a parent group.

OBIEE Global Groups membership

On a new installation, you will notice 3 main groups that are created automatically by the system:

  • BIConsumers
  • BIAuthors
  • BIAdministrators

The BIConsumers is the generic group of which all users are members. This defines a user as consuming OBIEE content (capable of executing reports and dashboards). Please note this implies only executing content.

BIAuthors group defines the list of users who can actually create and own content in OBIEE catalog. This content can be of various types, starting from saved customization, to analysis and dashboard content.

BIAdministrators defines the list of users who have administrative rights over the system: ownership, archive/unarchive content, privilege editing, security editing, e.t.c.

Now, there’s an implicit inclusion/membership logic for these groups.

Any BIAuthors user is automatically also a BIConsumers user, therefore, the BIAuthors membership has as parent group the BIConsumers one:

WLSAC - Groups - BIAuthors - membership

Also, in the same logic, any BIAdministrators user is also an author of content, therefore the BIAdministrators has as parent group BIAuthors:

WLSAC - Groups - BIAdministrators - membership

User membership

Now, going back to our previous user, since his membership is not provided automatically through our LDAP configuration for this case, we will need to associate this user with the appropriate groups.

Go back to the Users and Groups -> Users and select your user from the users list

WLSAC - List of users - demo user

Edit your user

WLSAC - Edit users 

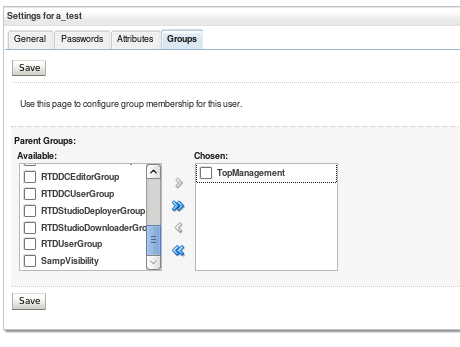
go to Groups tab, select your target group and drag it on the Chosen groups:WLSAC - Edit users - add groupWLSAC - Edit users - add group - 2

then save your changes:

WLSAC - Edit users - add group - success

Creating a new Application Role

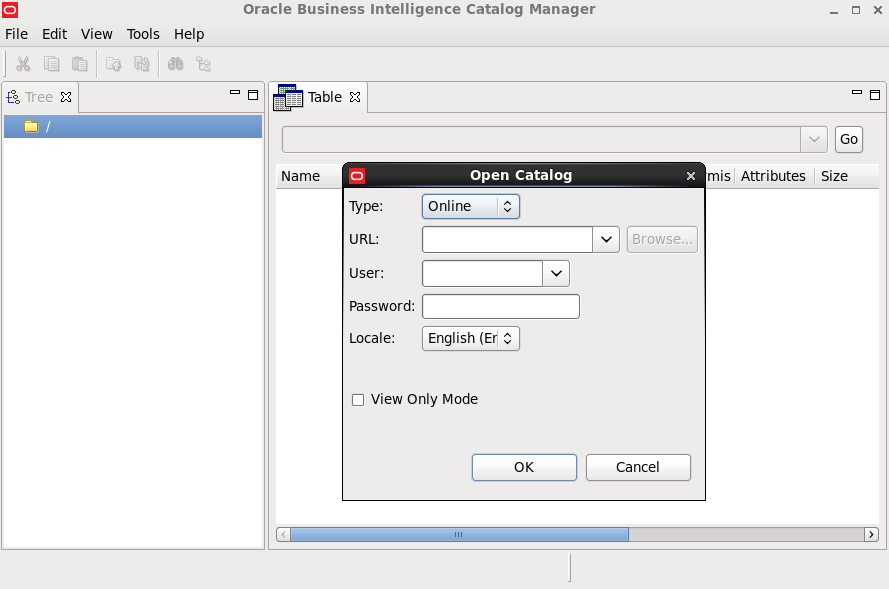
For creating a new Application Role, login to your WebLogic WLSEM - loginServer Enterprise Manager  with an admin user (e.g. weblogic), accessing the link formatted as ::/em.

By default, the server is defined as the IP address where you have installed your BI Instance, and the default port for the Administration Console is 7001.

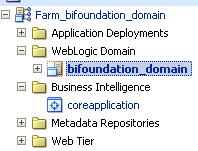
When the Enterprise Manager Homepage is displayed, navigate to the Business Intelligence > coreapplication menu item, then right-click on it. When the right-click menu is displayed, select Security > Application Roles  (path might differ if you have a clustered BI Server).

WLSEM - coreapp

The Application Roles page will then be displayed.

WLSEM - Application Roles

So at this point, there are three administrative tasks that you might need to perform around the WebLogic LDAP server, and application roles and policies:

  • You may have to create new application roles, and assign users to these, either through existing LDAP groups or by creating some new ones
  • You may have to alter or create new application policies, and
  • You may need to bundle up these application roles and policies, and other security settings, and migrate these to a new server.

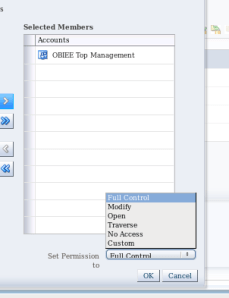
To create a new application Role, please make sure you specify all required criteria. Note that Display Name will be the name that will show up in Front-end/Presentation layer when you will want to apply security. If display name is null at creation time, display name will be the same as Role Name. Please make sure to fill in appropriate details in description field regarding the business scope of your role. This will be very helpful later on, when debugging and for other users.

WLSEM - Application Roles - new

Another detail you should be mentioning when creating a role is the role Members. Usually, you will add in all groups that should pertain to this role, as well as any additional Roles, if required. You can also add individual users.

WLSEM - Application Roles - membership options

In our case, I have added for our application role the TopManagement group.

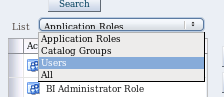
Search for desired the group and click on the arrow (if you want a full list just click on the arrow, as the initial display is empty).

WLSEM - Application Roles - membership add then make sure to select the desired group (it will become grayed out) before clicking ok:

WLSEM - Application Roles - membership add - selection

and then save your Application Role  with all desired changes

WLSEM - Application Roles - new - complete

this save will bring you back to the application roles list, with a success message on the top:

WLSEM - Application Roles - confirm new

OBIEE Global Application Roles membership

Please not the generic out-of-the box Application Roles that come with an OBIEE install:

  • BIAutor
  • BIConsumer
  • BIAdministrator

Looking at membership, you will notice that BIAdministrator has as members ONLY the BIAdministrators group.

WLSEM - Application Roles - BIAdministrator - membership

The BIAuhor has both BIAuthors associated group, as well as the BIConsumer Application role (the same type of inclusion we have noticed in the OBIEE groups)

WLSEM - Application Roles - BIAuthor - membership

while BIConsumer has BIConsumers associated group, as well as the BIAuthor Application role (the same type of inclusion we have noticed in the OBIEE groups) and a generic authenticated user application role (authenticated-role).

WLSEM - Application Roles - BIConsumer - membership

This last role is a generic OBIEE application role that any user who can login to your system will have by default.

Hope this helped you understand a bit of the logic behind users, groups and application roles.

Note: Please note this tests were done on OBIEE 11.1.1.7.1.

OBIEE Action link passing Hierarchical Column level

Issue Faced

In a summary report we are using a hierarchical column. We now need to link this summary report to a detail report. Challenge is while linking the two, since parameter passing does not support pass of Hierarchical columns.

Summary reportDetail report

Solution

Implementation – Using Hierarchical columns

In this solution option we will be using an additional hierarchical column in detail report and selection steps.

  1. In the detail report add the hierarchical column and hide it . Don’t exclude the column .Detail report - step 1 - add hirarchical columnDetail report - step 2 - hirarchical column hidden
  2. Go to the selection steps , here the highlighted column is our hierarchical column.Detail - selection steps
  3. Edit the “Start with all members” and select the ‘override with prompt’ and select OK.  Detail report - step 4 - Sel Stp  - start with overwrite with prompt
  4. Then click the “Then, Next Step” and keep all the members of detail level of the hierarchy column as shown here  Detail report - step 5 - Sel Stp  - then add
  5. Save the detail report and link the summary report with detail report using an action link.

Summary - Column - Action link

Report behavior

Summary report: select desired level value:

Summry - Lvl2 - select

When drilling into detail report, observe selected data:

Detail report - keep level 2 selection

Hope this solution will help you as well when dealing with hierarchical columns.

Note: Please note this tests were done on OBIEE 11.1.1.7.1.

An invalid Username or Password was entered

What is ‘BISystemUser’

OBIEE System User ‘BISystemUser’
“BISystemUser” is an internal OBIEE system user used as an inter-bi-component communication user, this could also be used when Impersonation is used. This is referenced by an Authenticator (usually Default Authenticator unless changed to different providers like Active Directory or other directory).

Scenario

 Impact on Deleting ‘BISystemUser’

OBIEE unable to login

 When deleting the ‘BISystemUser’, when default access configuration, OBIEE System will no longer allow any user to login.

Deleting the user causes the system to close down on allowing any connections into the Presentation layer; any user trying to login will be thrown authentication error (“An invalid Username or Password was entered.”).

Step by Step

WeblogicBISystem’ Role Check

  • Login to weblogic: http://host:port/em
  • Go to Business Intelligence->coreapplication->Security->Single Sign On ->Application Policies and Roles -> Configure and Manage Application Roles

Em - coreapplication EM - configure and manage application roles

  • Select the ‘BISystem’ role from list and check on the Membership section if the ‘BISystemUser’ is still there

BISystem user BISystem user membership

  • if user is not found in there will need to add it after its re-creation

Weblogic User Check

  • Go to Oracle Weblogic Server Security Provider for User Management page (you will need to login again)

Weblogic - application roles Setting for my realm

  • Check in the table for ‘BISystemUser’ user

check for user in list

  • If user does not exist go to Recreating User step

Recreating User

recreate BISystem

  • Create new user by clicking new
  • Useful tips:
    • Make sure Name for the user is exactly ‘BISystemUser’
    • For best practice make sure you fill in a meaningful description – to ensure user is not deleted again by mistake (eg. System user, internal OBIEE use)

User description

  • Keep in mind password for the ‘‘system.user” Password Check & Change step

system.user’ Password Check & Change

  • Go to WebLogic Domain->bifoundation_domain->(right click)->Security -> Credentials

bifoundation_domain

  • In here, edit the ‘system.user’ and update password to match the one for the re-created user

credentials store provider  bisystem - Edit Key

Delete Cached Credentials

Within the operation system, we need to delete the cached credential files, to make sure our changes are applied.

File name is (there will be 2 files, a cacheduserinfo and a cacheduserinfo.atr – both need to be deleted)

  • For Linux OS (make sure you have read/write rights on the oracle files – best use root rights):
    • go to root folder (or oracle home): cd / (cd oracle home path)
    • search files: find -name cacheduserinfo – this will list up files cacheduserinfo for all user, so you will need to select the path for the bisystemuser (will be something like this ./u01/oracle/mw/i…../root/users/bisystemuser/_prefs/cacheduserinfo)
    • delete files: rm path/filename
    • confirm delete: Y
  • For Windows OS:
    • search for files: cacheduserinfo and atr and delete them

(Command line for search: dir  cacheduserinfo .* /s – make sure you are searching within oracle home directory. To get there use: cd path)

Finish and Test

Restart Services

In order for changes to be applied, we need to restart the  BI server components for system to reload new permissions, configured.

  • in weblogic go to Business Intelligence->coreapplication->Overview
  • restart all

Restart components

      That’s all. Please test your work now!

Note: Please note this tests were done on OBIEE 11.1.1.7.1.

Undo drills and view prompts

1.    About ‘Undo drills and view prompt values’ message

We have the following scenario:
A dashboard prompt on column A.
A report on this dashboard, which uses column A as a table/pivot table prompt.
In some cases, even though the dashboard prompt seems to be applied, you get an error on the page for the report:
Undo drills and view prompt values - warning
Once you click on the ‘Undo drills and view prompt values, the report will run, and will have the dashboard prompt applied.

2.    Scenario Details

We have this generic scenario:
–         a Time prompt
Time prompt
–         a simple report based on time, with the column exposed in the report and also prompted
with a column prompt used in the table view
Test report Criteria
which will result in a view like the one bellow
Table view - 2011 default
While saving this report, we add it to the dashboard, resulting in a simple dashboard, like this:
Dashboard
However, after certain changes, you get to the situation where the dashboard will throw the following error : (The layout of this view combined with the data, selections, drills, or prompt values chosen resulted in no data. Undo drills and view prompt values.)
Dashboard - error
Which is warning the user about some saved selections he’s not aware of.
Once the user clicks on the Undo drills and view prompt values, the report displays data as it should be, for the selected time period.

3.    Where Is the Problem?

The main question is now, where the problem is and how did it started?
Table view - default selection
Let’s see the steps we’ve been through and where it might be.

When creating the report, the report prompt column was populated by default, picking up the first value for the column, in the columns default sort order, correct?

Well, when saving the report like that, and adding it to the dashboard, we had no actual problem.

However, once we played around with the report, trying a couple of other selections in the column prompt, we save it again, with the default value back to the original one.
If we now go to the dashboard, we encounter our mysterious error.

What happened?
The report had now perceived, after the various selections, that the last selection is a saved selection which must be run initially on report load. That is the ‘saved selection’ we were not even aware of.

How to check for it?
If you go to edit your report, in the Advanced tab, you will notice the report XML.
You will see in there is a section/tag called ‘staticMemberGroup’.

If you still have a version of your initial report saved, and go to the Advanced tab to study the report’s XML, you will notice this report has no section/tag called ‘staticMemberGroup’.
report with hidden saved selection
Fig. 1 Report with hidden saved selection
report with no hidden saved selection
Fig. 2 Report with no hidden saved selection

4.    How to Fix?

Solving? We have two options, so far.

  1. XML level option
  2. View level option

XML level option implies changes on the report at XML level.
What you need to do is edit the XML and just delete the entire ‘pageEdgeState’ section/tag, and apply the changes.
xml level fix
View level option implies changes only on the table/pivot table with prompted column level.
What you need to do is edit the view, remove the column from the prompt section (move it to excluded), wait for the report view to load, save it, then move the column back in the prompt section and save the report.

Note: Please note this tests were done on OBIEE 11.1.1.7.1.